How to Prime a Pump in Positive Suction and Negative Suction Systems
Part 1
Why do we need to prime the pump?
The centrifugal pump consists of moving parts that rotate to create the centrifugal force necessary to build up pressure within the pump vessel. There will be stationary components (support) structures and dynamic (moving) parts when there are moving parts. Friction is created between the stationary and dynamic parts. If there is no lubrication between the parts, the heat generated from friction will result in damage to the pump. For mechanically sealed pumps, the mechanical seals could be damaged. For magnetic drive pumps, the shaft or bearings could be damaged.
Priming the pump simply means filling the pump and the entire suction piping with liquid. The liquid will act as a lubricant/coolant between the stationary and dynamic parts. Having the pump casing filled also allows pressure to build from the centrifugal force that pushes the liquid out of the pump, resulting in fluid transfer or circulation, which the pump is designed to do.
Priming must be performed before starting the pump for the first time. Priming must also be done if the suction tank and piping have been drained for maintenance, repairs, cleaning, or other reasons. Finally, we recommend checking the pump is primed before restarting the pump after an extended shut-down, even if the tank or the piping has not been drained during shut-down.
Part 2
Priming the pump in a positive suction system
A positive suction system means the liquid level in the suction tank is above the pump (see Fig. 1). Priming of the pump can be accomplished simply by opening the valve of the suction piping. Gravity will push the liquid from the suction tank through the suction piping into the pump.
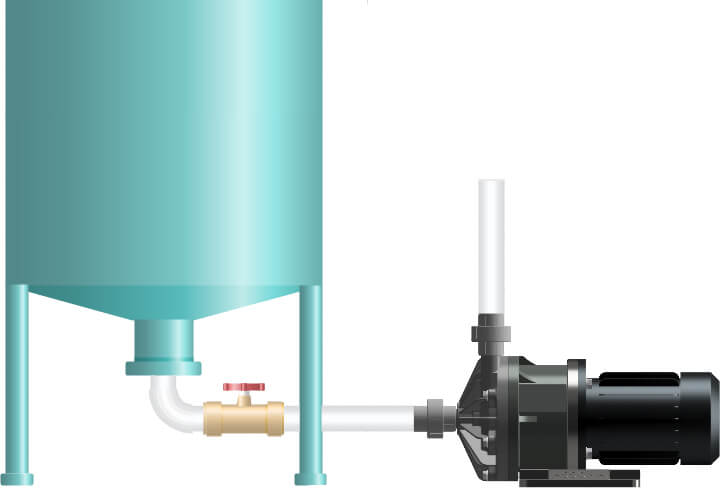
Fig. 1
In a positive suction system, we need to make sure the air inside the suction system has the means to escape. In the following system (Fig. 2), the discharge piping has a check valve. If pressure is present above the check valve, the air within the pump cannot escape. To solve this problem, a priming valve needs to be installed for the air to escape. In Figure 3, the priming valve is installed under the pressure gauge. The section of tubing leads back to the suction tank, effectively a bypass system. Make sure the end of the tubing is not submerged in the liquid, which would prevent effective venting of the air.
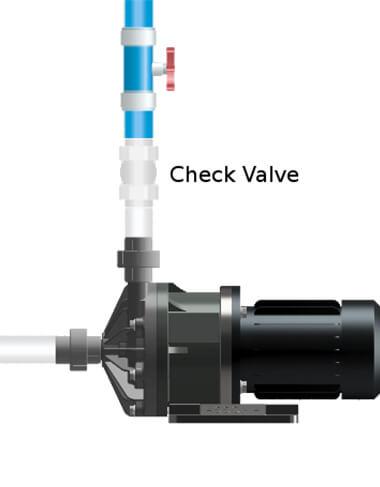
Fig. 2
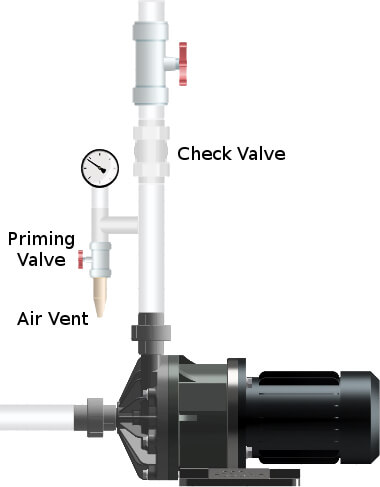
Fig. 3
Once we have the necessary components in place, we shall start the priming steps
-
Step 1: Shut off the discharge valve.
It is common practice to start the pump with a closed discharge valve. Priming is the step before we start the pump, so it is good practice to shut the discharge valve at this point. - Step 2: Opening the priming valve and the suction valve
Opening the priming valve allows air to escape. Opening the suction valve allows the liquid to flood the suction piping into the pump. Ideally, most of the air in the suction piping should be removed, however, for long suction piping, some of the air will be stuck to the top part of the piping. Removing this air involves starting the pump, which pulls the air into the pump, and stopping the pump, allowing the air to leave the pump. Repeat the process until the pressure gauge displays a stable pressure. - Step 3: Closing the priming valve
When you are satisfied the pump is fully primed, leave the priming valve open if you intend to use the priming tubing as a bypass, otherwise, close the priming valve. At this point, you may proceed with commissioning/running the pump.
Part 3
Priming the pump in a negative suction system
A negative suction system has the liquid level in the suction tank below the pump (see Fig. 4). In such a system, the pump cannot be primed by just opening the suction valve.
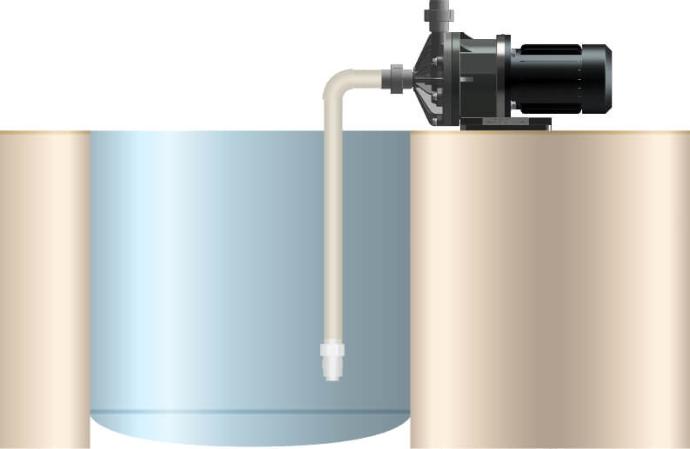
Fig. 4
Step 1: Check the system
Make sure the suction piping has a foot valve or a check valve so that the liquid does not drain back to the suction tank during priming or when the pump is stopped. There should also be a priming piping at the discharge of the pump (see Figure 5).
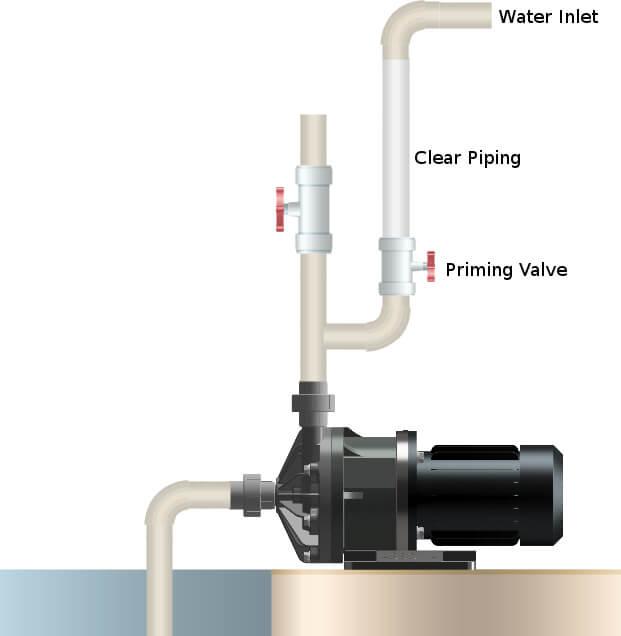
Fig. 5
Step 2: Priming
We need to remove the air from the suction system. This is done by adding liquid into the system through the priming pipe. The liquid will displace the air in the suction piping and the pump. After priming, wait for a few minutes to ensure the liquid level remains. If the liquid level falls, then the foot valve or check valve is faulty and must be replaced before proceeding. Once the pump is primed, shut off the priming valve and proceed with commissioning/running the pump.
It is not uncommon for the foot valve or check valve to get stuck or fail during operation, therefore, it is important to make sure the pump is primed every time before restarting the pump, especially after extended shut-down.
Part 4
Common issues when priming the pump
- Long Piping. For positive suction systems with long suction piping, air tends to be trapped in the top section of the piping due to a slower flow rate. We may observe from the priming piping that the liquid is flowing and assume the pump is fully primed. As the pump runs, the air pockets get sucked into the pump and some of the air may accumulate in the pump. If the air accumulation is significant enough to prevent sufficient circulation for pump cooling, the pump gets over-heated and fails.
- Bypass system. When using the bypass system as the vent, we need to check to see if liquid stays in the bypass during shut-down. If the liquid accumulates in the bypass, it may exert backpressure and prevent air from escaping. In this case, we need to make sure the bypass system is emptied of all liquids before we start the priming process. Such bypass systems should have a built-in drain to empty the system before priming.
- Shared venting tube. We have customers who would have all the pumps vent to a common drain pipe for large systems with several pumps. In such a system, we need to make sure the common drain pipe is large enough to prevent filling up. If the common drain pipe reaches capacity, it will have backpressure preventing air from the vent tubes from being removed. One possible solution would be to attach the vent tubes at an angle to the pipe, so the pipe’s liquid flow will help draw the air from the vent tubes.
- Suction Issues.
- Suction level too low. If the liquid level is not high enough to generate sufficient pressure to push the air out of the piping system.
- Blockage in the suction piping. The suction may be blocked due to a faulty valve or clogged strainer, preventing the flow of liquid.
- Leaking suction. If the suction piping is leaking, then even after priming, the air can be sucked into the pump causing damage.